Showing posts with label GIS Programming GIS 5103. Show all posts

Tuesday, August 7, 2018

Final Project: Python


My final project proposal is to locate cities or towns in Texas of a minimum size (thinking 100,000) that are within 50 miles of a major airport that contain a lake or river.  I will need to obtain data for the state of Texas including lakes and rivers as well as airports and population of cities.  Utilizing python script: 1) create a buffer around airports of maybe 50 miles.  2)Clip population data and lake/river data to airport buffers.  3)utilize the results to Create a search cursor to locate cities or towns over 100,000 in population 4)print the list of locations.

First image above is of the printed list of cities/towns with populations over 100,000, that are within 50 miles of an airport and the second is of the printed dictionary containing the name of the city and the population.  Below is an image of the catalog files showing the Clipped cities and NHD in the results folder.

Tuesday, July 31, 2018

Module 11: Sharing Tools


The FINAL MODULE for GIS Programming!  We explored different methods for sharing script tools, learned ESRI recommended folder and file structure for sharing script tools, identified data and workspaces for script tools.  We learned  how to created a geoprocessing package, embed scripts and password protection tools and created script tool documentation.

This week in lab we focused on the standard folder structure and filepaths necessary when sharing tools and looked at some geoprocessing packages that provide an alternative solution to distributing script tools.

Module 10: Creating Custom Tools


This week we created a custom tool.  We were provided with a stand alone python script.  In ArcMap we created a toolbox and added the script to the toolbox (adding a description and check the "store relative path names").  We added parameters to the tool by right clicking the tool and choosing parameters 1.  Input file location 2. Clip Boundary Feature 3. Input features 4. Output file location.  We set the types for each and location:


Wednesday, July 25, 2018

Module 9: Raster


This week we learned how to use Python to work with spatial data in ArcMap, specifically working with rasters.  We gained experience listing available raster datasets within a specified workspace, describe properties of the datasets, utilized arcpy.sa (spatial analyst) to define raster parameters and finally wrote algebra expressions in Python. 

We reclassified a raster to show only forested lands, further limited to slope 5-20 and aspect 150-270.  Green in the image above does NOT meet these requirements.  The purple color DOES meet all the requirements. The new raster was saved to the gdb file in our data folder.  Temporary rasters for calculations were not saved.

Thursday, July 19, 2018

Module 8: Geometries


This week used Python to work with spatial data in ArcMap. Specifically, we focused on reading and writing geometry objects (aka Vector data).   Vector data can be organized into rows of an attribute table, each row may contain an array of object or point information continue down to individual vertices that make up the shape.  Geometry tokens are shortcuts to specific geometry properties.  This week in lab we utilized search cursors and for loops to get through, row, array of parts to points.  Then the information was converted to strings to write the OID, point number, x coordinate, Y coordinate and name of the feature to a text file.  Above is a section of the text file, created and written with Python, containing the information

Sunday, July 1, 2018

Module 7: Explore/Manipulate Spatial Data

This week we will studied various approaches to exploring and manipulating spatial data. Specifically, we looked at list functions and how they can be used, built-in Python functions, the ArcPy data access module arcpy.da, cursors, and were also introduced to tuples and dictionaries.  This week we explored: 

  • how to check for and describe data with arcpy.Describe, 
  • how to manipulate list of data by indexing, delete, sort and append
  • how to create an empty dictionary {}, and add, change and delete
  • how to work with search cursors to iterate over data stored in lists 
We learned the benefit of working with dictionaries to obtain our data for the above script. We also used a search cursor with SQL expression and added those results to an empty dictionary.

Tuesday, June 19, 2018

Module 6: Geoprocessing with Python


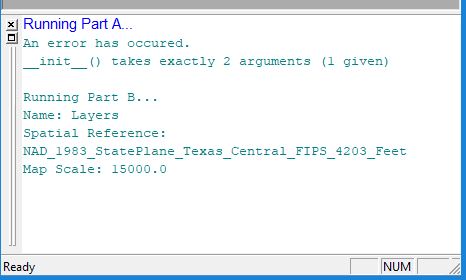
Above is the messages from the script I wrote and ran this week.  I utilized Model Builder in ArcGIS to get the basic code and then exported it to a python script and edited in PythonWin.  The instructions for the assignment were to write a script that performs the three geo-processing functions: Add XY tool, Buffer tool, and Dissolve tool. Get Message function was utilized following each tool to document the successful completion of each tool.

ArcPy site package is like a library of functions that add functionality to Python.  The site package works very much like a module, but a package contains multiple modules as well as functions and classes. 

A function in Python is a specific bit of program that does a specific task. Functions syntax is typically: <function>(<arguments>)

A method is a function that is closely coupled to an object.  Method is called as follows: <object>.<method>(<arguments>)

Classes can be used to create objects, and once the object is created, its properties and methods can be used.  Classes are often used to avoid having to use long and complicated strings.  Arcpy classes are often used as shortcuts for tool parameters that would otherwise have a more complicated equivalent.  Syntax for setting the property of a class is:  <classname>.<property>=<value>

Tools can be called 1)by its function- arcpy.<toolname_toolboxalias>(<parameters>) or 2) as a module- arcpy.<toolboxalias>.<toolname>(<parameters>) 3)once a particular tool is identified, the tool's syntax can be accessed from python using the Usage function
All tools are functions, but not all functions are tools. 

One of the points from our exercises for this week was a focus on getting help with syntax.  Help with syntax can be obtained a number of ways.  A couple of ways are: 1) help panel is visible within the Python window, entering the code brings up the syntax for the tool 2)from the search menu, search the tool, clicking the definition in the search tool will bring up the item description that contains syntax and examples of code.

Sunday, June 17, 2018

Module 5: GeoProcessing


This week the focus was geoprocessing.  Geoprocessing in its most basic form is a series of actions performed on geographic data.  There are many geo processes, including reprojections, clipping and buffering.   Central to the concept is that there is input data (one-or-more), the process/task itself and then the output data.

There are two categories of tools:  1)System: These include the built-in types of tools or of any type that are created by Esri. These tools themselves are not run in sequence, but can
be run in batch mode and 2)Custom: Tools of any type that can be built by a user or obtained from
third-party developers. And these are the type that we are learning to begin building in this class.

There are also types of tools:  1)Built-in: The tools that come w/ the Esri installation as part of ArcGIS are known of as the built-in tools. These tools are created with programming languages such as c++ and the .net languages,  2)Model: built using ModelBuilder, and 3)Script: Tools that run a script through a tool interface

The four elements of models are 1)project data (input) 2)tool (process) 3)derived data (output) 4)connectors (arrows to show the direction of data flow).

We also set our current workspace, in environments, to your specific module results folder and set the scratch workspace, where temporary files and folders are housed. 

ArcGIS tools have python script behind the scenes and as such can be exported from a model to a python script.  However the script that is exported is typically not a stand alone script.  To become a stand alone script, the exported script could need additional information, like lines of code and/or full drive addresses for data locations.

In this week's lab we practiced several types of geoprocessing, including batch processing (running a tool or series of tools on multiple inputs, set the parameters once and list inputs, processing time is the same but the set up time is saved) , making new tools with ModelBuilder, and converting models into scripts and script tools. We created our own model and script tools that perform two simple geoprocessing tasks (clip, select and erase). The results are the picture above.  Finally, we shared our toolbox with the dropbox submission.  

Tuesday, June 12, 2018

Module 4: GIS Programing


Above are the results of the scripts this week.  This week we learned to recognize syntax errors and exceptions, syntax errors show up when the script is checked, exceptions are not caught by a check of the script but will result in an error message when the script is run.  We practiced using debugging by stepping through code, adding print statements to check progress in a script, commenting out code to skip parts and we "caught" "thrown" exception errors with try-except statements.  We also learned that syntax errors are errors with the way the script is written, and that logical errors do not affect the syntax so for this lab they were spelling errors and file location errors.  

Peer Review: Scripting MODFLOW

Review of Scripting MODFLOW Model Development Using Python and FloPy
The overall organization of the paper was good.  Sections for Abstract, Introduction, Conclusion, Acknowledgments and References were all present and clearly labeled.  The material was ordered so that it is logical.  Subheadings helped to break up the main arguments into a basic example, advantages of scripting, and a more complex example.
The introduction of the paper gave a clear purpose of the paper, utilizing python script as alternative to utilizing GUI (graphical user interface) for the construction of a groundwater model. Historical use of a GUI in groundwater modeling is reported concisely.  Adequate citation is provided throughout the introduction.  The conclusion of the introduction clearly states the position of the paper as well as well as potential oppositions to be addressed.
The methods and results although sometimes outside the scope of my understanding appear to be adequate in detail and explanation.
The conclusion section opens the discussion of how the use of python programing instead of GUI facilitates analyses that can be difficult of impossible to complete with GUI, automating processing, records steps making it reproducibly by others, all while utilizing open source language (Python) and open source tools (FloPy).
Acknowledgments are generally given to contributors.  Welcome for additional information and or suggestions.  Standard non-endorsement statement included.
References appear to be in ample supply as well as well sited and organized.
References
Bakker, M., Post, V., Langevin, C.D., Hughes, J.D., White, J.T., Starn, J.J., & Fiennen, M.N. (2106, March 30).  Scripting MODFLOW Model Development Using Python and FloPy, Groundwater, 54: 733-739.  https://doi.org/10.1111/gwat.12413

Friday, June 8, 2018

Module 3: Python Fundamentals Part 2


This week we studied more advanced aspects of Python scripting.  We learned correct usage of file paths, how to import modules for additional functions, appropriate naming conventions, loop structures, and commenting.  We examined conditional statements that perform different actions in different situations, and for and while loops that repeat the same processes multiple times. We also practiced finding and fixing errors in Python code.  In this week's lab we were asked to use modules to access a wider range of methods and functions, write conditional statements and loop structures, and identify and correct errors in code.
The lab assignment, was to complete an unfinished Python script, correcting some errors in it, and adding new blocks of code. The result if successful would have been a complete Python script, including a comments section containing your name and contact information, the date the script was completed, and a brief description of its purpose. 

At the due date, Wednesday, I have not been successful. 

Thursday: attended virtual office hours with professor, made progress past sticking point.  Only to encounter another sticking point.

Friday: requested email assistance from professor.  Finally completed module successfully.

Hope these struggles are not indicative of the rest of the semester!  Need my brain to learn to think in python.

Monday, May 28, 2018

Module 2: Python Fundamentals Part 1

This week we were exposed to some of Python's different data types (strings, numbers, and lists), performed basic math operations in Python, identified the basic functions of variables, strings, and lists, distinguished between Python statements (an instruction that tells the computer to do something) and expressions (a value), Python functions and Python methods.  Python functions (like length, type or range) are typically formatted function(parameters or arguments) and returns a value.  Python methods (similar to python functions only closely coupled with an object) are generally formatted object.method(arguments).

In lab this week we practiced some of the basic, fundamental features of Python scripting. We learned to assign different types of variables, such as strings, lists, integers, and floating-point numbers. We manipulated those variables, or creating interaction between them,

The lab assignment, to write the following script: started with assigning a variable to my name as a string,  then to split the string for my last name, print my last name, find the length of my last name, and multiply the length by 3.   After writing the script to run the script (seen above).

Friday, May 18, 2018

GIS Programing:


So here we go... Week 1 GIS Programming.  The focus this class will be Python programming language, as this became the preferred programming language for use in ESRI's ArcGIS in 2010 with version 10.0.  "Pseudocode is a language very close to English that allows us to represent a program concisely" per Agarwal reading.  Pseudocode can be represented in the format of Start-Input-Goal- Tasks-End (review/evaluate/repeat) or could be flowchart format. 

IDE stands for integrated development environment and is used as a script editor. There are several IDE that work with Python.  This week I accessed three.  IDLE is what ships with some Python 2.7 version.  When launched (start button- ArcGIS-Python 2.7-IDLE) The interactive window Python Shell opens.  When you type a line of code and press ENTER, that line is interpreted and run immediately.  PythonWin is another script editor (one way to launch PythonWin start button-ArcGIS-Python-PythonWin).  The interactive window opens by default.  Code can be written and run in this environment but not saved.  Typically the interactive window is used as a tool, kept open, while write script in a script window, that allows you to save.  To open a script window on the pythonwin menu bar click file-new, in the dialog box highlight python script and click ok.  With the script window activated the script can be saved (file-save as-name.py) In the script window you can write code but it does not automatically run when you hit enter.  This allows you to write multiple lines and when you decide to run the script you can either click the run button, or file-run from the menu bar, or CTRL+R.  This brings the run script dialog box.  A third access to python is in ArcGIS (starting with version 10) python window button on the tool bar.  The python window button opens a window with a python interpreter on the left and help on the right. 

I work on windows 10 at home (new this year to me).  When I access the GIS desktop from Argoapps and click on the start button there is not a complete list of my programs, there is also not an all programs option.  This was new to me since, when I am not in this environment, the start button from my laptop does provide a list of programs and an all programs option.  I called the UWF help desk and when the technician remoted in he noticed at once that this is normal for Windows 10.  Once you click the start button you start typing the program you are looking for and it pulls it up.  So for this lab once I started typing “pyth” I was able to see the options for PythonWin and Python IDLE.

This week I accessed python 3 ways.  I experimented writing the same line of code:  print "Hello World" in each environment.  I ran a script provided in the lab that set up the folders in my student drive that I would be using this semester for this class.  The picture above is of those folders created by the provided script.  Week 1, check!